Talk Human to Human NOW!
For Businesses Call:
608.836.0282
For Residential Support Call:
608.237.6152
Cheers to local, fast, friendly Internet! Below you’ll find information about how to connect to the Internet in your home and how to contact us if you have any issues.
First you must purchase a router. We recommend looking for these features.
Connecting a router to an ethernet jack in your Asana apartment involves a brief series of some fairly simple steps. This guide will help you set up your router for a seamless internet connection.
Remember, specific router models may have slightly different setup procedures, so always refer to your router’s manual for detailed instructions.
Here’s a general step-by-step guide to get you started:
1. Unpack Your Router
Unbox your router and identify its components. Typically, this includes the router itself, a power adapter, an ethernet cable, and possibly an installation guide.
2. Locate the Ethernet Jack


Find the ethernet jack in your apartment. It’s usually located on a wall in living areas or bedrooms.
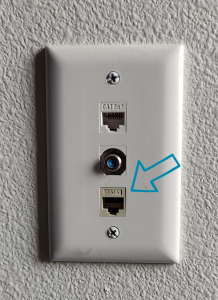
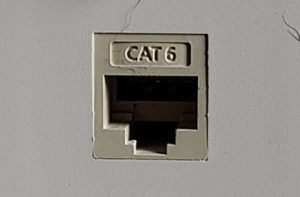
You will need to locate the ethernet jack that says “CAT 6”.
If you locate a jack that says “CAT 5E” that is the incorrect jack.
3. Connect the Router to the Ethernet Jack
a. Take one end of the ethernet cable and plug it into the ethernet jack on the wall.
b. Plug the other end of the ethernet cable into the WAN (Wide Area Network) port on your router. This port is often distinguished by its color or labeled as “WAN,” “Internet,” or has a symbol that resembles the globe.
4. Power On Your Router
a. Connect the power adapter to your router and plug it into a power outlet.
b. Switch on the router. Wait for a minute or two for the router to start up. You should see indicator lights turning on, usually one indicating power and another indicating internet connectivity.
5. Connect to Your Router
You can connect to your router either using a wireless connection or through another ethernet cable.
6. Configure Your Router
a. Open a web browser on your connected device.
b. Enter the router’s default IP address in the address bar (commonly 192.168.1.1 or 192.168.0.1; check your router’s manual for the exact address).
c. Log in using the default username and password (often “admin” for both, found on the router or in its manual).
d. If your device is new, follow the setup wizard to configure your network settings. This may include changing your network name (SSID), setting a new password, configuring network encryption, and updating the router’s firmware. For many routers, if you do not complete this step, you will not be able to connect to the Internet.
7.Connect Your Devices
Now that your router is set up, you can connect your devices to the internet by selecting your network’s name (SSID) from their Wi-Fi list and entering the password you’ve set up.
Troubleshooting

